I use Gravity Forms on almost every project I work on. It can build basic contact forms quickly and easily, but it can do so much more. I’ve put together a few tips and tricks I’ve learned over the past couple years working with the plugin. Feel free to add your own in the comments.
1. Dropdown validation
Gravity Forms lets you choose which form fields are required on any given form. This gives you plenty of flexibility. However, making dropdowns required can be tricky. I like to put a ‘-‘ for the first value of a dropdown, but somehow this was passing the “required” test. I dug a little deeper and found that I had to remove the value associated with the label.
- Add a dropdown field and enter your data
- Make field required
- Check “show values”
- Remove the value for the first item in the dropdown
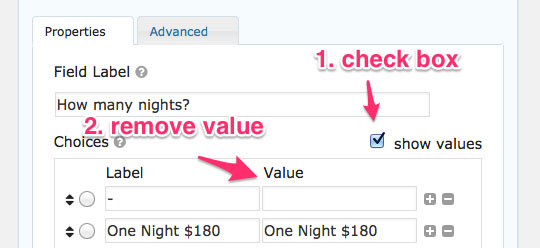
Now the user will be required to choose an option from the dropdown.
2. Pass data into a form from another page
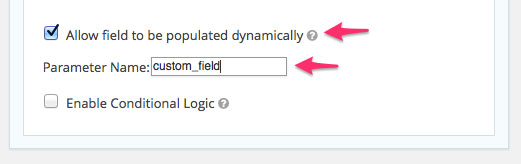
Gravity Forms has a couple different ways to populate a form field dynamically. Recently I used the query string method to pass data from one page to a form on another page.
I needed some custom fields from the page to be added to the form on the next page. To accomplish this, I added the custom field data to the end of the form link as a query string. Here’s an example of the code:
<a href="/form-page/?custom_field=<?php echo get_post_meta( $post_id, 'custom_field_name', true ); ?>">Go to Form</a>
When the user clicks on the link, it takes them to the form and pre-populates the designated field with the custom field value. To get the form to recognize the query string, you have to set two values in Gravity Forms, “allow field to be populated dynamically”, and “parameter name”.
- On the form field, click the Advanced tab
- Check “allow field to be populated dynamically”
- Set the parameter name to the name of your query key, in this case “custom_field”
3. Adjust the layout of Gravity Form fields
Gravity Forms comes with some built in classes that you can add to your fields to adjust their layout on the page. Most of the time these classes will get you 95% of the way to the styling you want.
To add a class to a form field, click on the Advanced tab and paste the class name in the “CSS Class Name” field.
Note that these only work with the “top label” form layout option.
Some of the built in classes for laying out fields that I use all the time include:
- gf_left_half
- gf_right_half
- gf_left_third
- gf_middle_third
- gf_right_third
Another neat trick I just used recently is creating a scrolling “Terms of Service” field. Instead of having the text take up half the page, add the following class to a section break field:
- gf_scroll_text
There are many more classes available on the Gravity Forms documentation. Remember you can always add your own classes and write your own custom CSS styles as well.
4. Quickly add values to dropdowns, radio buttons, or checkboxes
If you have a lot of data that you need to add to one field and don’t want to enter each one individually, Gravity Forms comes with a feature called “Bulk Add/Predfined Choices”. This can be a real time saver. I remember the first time I found it, AFTER spending over an hour entering data the hard way.
- Add a field, such as a dropdown
- Click “Bulk Add/Predefined Choices” under the choices section
- Choose an option from the left to add predefined choices, or paste in your own list of data on the right. Make sure each value is on a separate line.
- Click “Insert Choices”
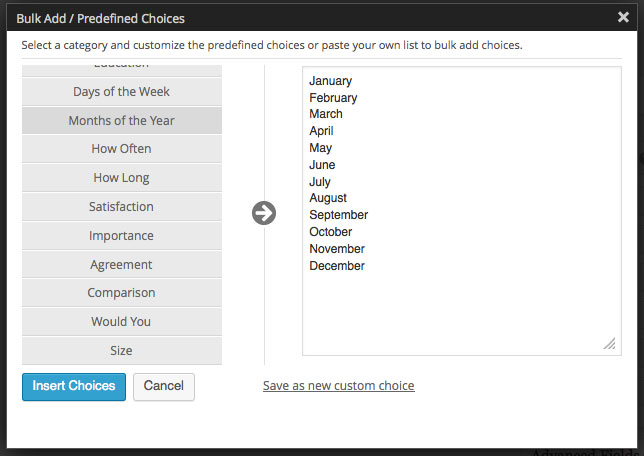
Some of the time saving options include a list of Countries, States, Days of the Week, Months of the Year, and many other common options. You can even save your own data as a custom choice if you need to use the data in more than one field (or form).
5. Add a mailing list opt-in to Gravity Forms
This last one is made possible by the plethora of plugin extensions built to work with Gravity Forms. If you do a search on the WordPress repository you will find quite a few of them. Gravity Forms also has a few Basic and Advanced extensions on their site available to users with a Business and/or Developer license.
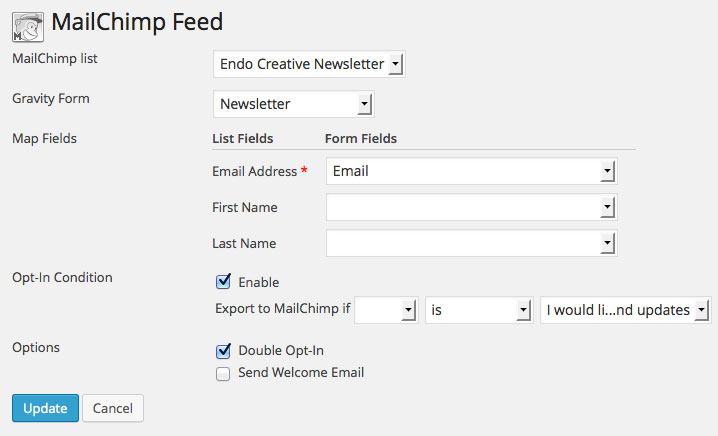
My go to email service is Mailchimp, and Gravity Forms has a Basic extension custom built to integrate with their service. After downloading it from Gravity Forms and installing it on your site, the process is pretty simple.
- Go to Forms->Settings in the WordPress admin
- Enter your MailChimp API key (here’s how to find it)
- Go to Forms->Mailchimp and create a new feed
- Choose a list from Mailchimp
- Choose the Gravity Form where you want to add the opt-in field
- Map the Gravity Forms fields to your Mailchimp fields
- Choose “Enable” for opt-in condition and choose the field that will cause the user to “opt-in”. I like to use a checkbox field for this that says something like “I would like to receive news and updates”.
- Choose whether to use a double opt-in and if to send a welcome email
Conclusion
I hope you found these tips and tricks helpful. They just scratch the surface of what is possible with Gravity Forms. And if you don’t have a copy of it yet, you can purchase a license here.

Nice post, thanks Jeremy. I love how usable Gravity Forms is, it’s given me the opportunity to be independent with something I previously had to rely on a developer to hard code. Your tips are a little developer-ish 😉 but thanks to your explanations they look quite doable, and I can see myself needing all of them at some point in the future so I’m going to bookmark this post.
Thanks Cecily. I tried to keep them as non-developer as possible, but a little code did sneak in. 🙂
Great post, Jeremy! I wish someone had told me about most of these when I started using Gravity Forms, particularly the “ready classes” for layouts. There’s a handy plugin that makes adding them easy too! It’s overkill for most sites but really handy if you make a lot of forms.
Thanks Mark. I didn’t know about that classes plugin. I’ll have to check it out. Thanks for the tip!
Sure thing! Here’s the link: http://wordpress.org/plugins/gravity-forms-css-ready-selector/
Helpful post, as always Jeremy. I wish I’d read it two weeks ago! I needed to create a form and spent quite a bit of time “out there” looking, reading, researching, testing. You know the drill! They all had constraints that did not suit me. I ended up using one and it’s working well, but the design isn’t what I would like. I’m going to spend time with Gravity Forms and see how it goes! Thanks for the tips!
Maybe you can add a 6th tip if this is possible. I have a registration form where multiple people can sign up for an event. In some cases everyone will include their own cell phone number, but in other cases there will be an “organizer” for the group and only that phone number would be used for everyone.
I have to give them the option, but these phone numbers are required fields.
So what I want to do is automatically copy the first phone number entered into all the other phone fields. Then the user can modify the phone as they enter each name, or just leave the default.
Is this possible?
I am very interested in an answer to this question as well.
Hi,
I was wondering if Gravity form would allow me to get an email after the first step of a 3 steps/page-breaks forms has been clicked.
So after the first step, before the first page-break, the button “next step” would send me an email with the info collected during step 1?
thank you!
Gravity Forms has a gform_post_paging hook that you could use to send an email when someone goes to the next page of a multipage form.
Thanks Jeremy, great post.
I manage 40 websites for a company (I’m a beginner) and we’re making bulk changes to all of our forms. Problem is, I can’t just export and import entire form because each of our sites requires different conditional logic on each form. Really, I’m just trying to copy one drop-down field ‘How’d you hear about us?’ and paste it into 50 or so forms. Is there a trick for that??
Thanks for your help!
Nate
Hi I’m a beginner and launching site soon! Can this be done? I need retailers to complete product submission forms so I can enter on to website. Forms have been created on gravity forms. I don’t want to show forms on website but can I send them via a link? Email? For retailer to complete?? Many thanks.
Hi Sarah,
I’m not sure what your question is. You have the forms created, so what extra functionality are you trying to do?
im looking for solution to bulk add including name and value. nb
You can do this by adding a pipe character between the label and value in the bulk add field.
Bulk Add Screenshot
Hey Jeremy,
For #2, can you pass variables into a pop-up window of a second form? I am trying to do something similar to Mayflower.com.
Thanks,
You could use Gravity Forms hooks for dynamic population to add the data to the second popup form. You would need to set the values submitted in the first form as cookies (or something similar), and then use them in the second form with the dynamic population hook.
Great post, Jeremy. Some really nice GF tips for people (including myself) !
Thank you, Jeremy! This is great stuff. No. 1 (dropdown validation) was particularly useful.
Wondering if you or any other GF users have figured out a way to generate a price from a pricing matrix? I have a client who sells blinds online, and some of them have 24″-120″ in width x 30″-120″ in length. Depending on what you pick for the Width and Length values, you could have hundreds of different prices. Is there a was in Gravity Forms to pull pricing info from a pricing matrix with hundreds of values?
Great post.
How would you populate a drop down with a list of values and depending on the choice redirect the user to other pages on your site?
Tim
I’m using a 5 page gravity form on my site, and each page has previous and next buttons, and under them previous and submit buttons. How do I get rid of the bottom set of buttons?
Hi Diane,
You could try using CSS to hide the bottom set of buttons.